In an ancient war against Sade, this fort was built at the intersection of the Aria and Milia rivers to protect against the undead pouring from the Labyrinth of Sade.
Sade sunk the fortress using atmospheric magic, and it has now fallen into ruin from neglect.
After completing Descension Ruins, speak to Zemu Taru (ゼーム テール) in the Arcane Ministry.
Material Checklist[]
All materials required to complete this dungeon are listed below. They are dropped by specific enemies populating the dungeon, but most(if not all) can be traded or sold in player shops or the auction house.
Note: I apologise in advance for the imprecise instructions. I'm writing these a while after having done it.
Rusted Great Gate (朽ち果てた大門): Floor 1[]
Light Angel Statue 1.1 (1)
Location: Directly across from entrance (Map reference: G7).
Instructions:
Activate the statue.
There are three piles of rubble in this area; one in each corner. (Map references: F7, F4 and H5). Examining the piles, selecting random options until you get an item from each of them. You can keep examining the piles until you get the item.
Use the machine at the end of the left path as you come in (Map reference: H7). Select the first option until you get an item (白色の粉末)
Return to the statue, and select the first option until you get access to it.
Options for Piles at F4 & H5 locations.
F7 Pile Option
Party Mode: 5 Rusty Slimes
Story Mode: 3 Rusty Slimes
Light Angel Statue 1.2 (2)
Location: The first statue you see as you enter the dungeon (Map reference: H3)
Instructions:
Examine the Statue. Though you probably can't understand it, it is asking for a password.
Directions to the Password Generator:
Just past Statue 1, in the area you just unlocked, there is a teleporter marked 1. Use this, and follow the path.
Turn right at the end of the path, pass teleporter 3 and the Guardian Statue, and use teleporter 2 right at the end.
From here, take the first left (walking through the flies), and continue straight until you reach an area with a Guardian Statue and 4 ladders (Map reference: 16).
Facing the Guardian Statue, climb the back left ladder.
Head to the right, jumping over the gap, and keep heading in that direction until you come to a tall, square room (Map reference: H3).
Jump down to the bottom. You don't need to use the steps: for some reason you don't get hurt when you fall down in this particular area.
Examine the slate opposite the barrier. This is the Password Generator.
Password Generator Options Translated
Select the option with a 2 in it from the Password Generator, and it will spit out a 3 digit number. This number is important, and unique, so make sure you don't forget it.
Walk through the barrier, and return to the 4 ladder area. Facing the Statue, go backwards past the flame traps and take the first right.
Follow the path, and you will see a slate past some flies. Examine this, and input your password.
The Light Angel Statue should now be activated. If it is not, you have put in an incorrect password, and will repeat the instructions from step 2.
Party Mode: 4 Fort Garrisons
Story Mode: 2 Fort Garrisons
Ladder Guide
Ladder Guide
Ladder NE
to Statue 3
to switch of teleporter 5
Guardian
Statue
Ladder SE
to Statue 4
Ladder NW
to Password Generator
to entrance
Ladder SW
to switch of teleporter 4
Handy Hint!
You will be returning to the 4 ladders area (See Statue 2) a lot. To save yourself a lot of time:
Make sure the Guardian Statue here is the last one you've touched.
Remove all equipment
Jump in the water
Warp to last statue touched, and revive.
Put equipment back on.
This method is substantially faster than walking (But use at your own risk).
Light Angel Statue 1.3 (3)
Location: In the 4 ladders area (See Statue 2), take the top left ladder. The Statue should be easily visible on the right.
Instructions:
Examine the Statue.
Go the Password Generator (See statue 2), and select the option with a 3 in it. It will spit out a 5 digit password that, like the password for statue 2, is both important and unique.
Take Teleporter 1 near Statue 1 as if you were walking to the 4 ladder area, but take Teleporter 3 that you usually pass.
Walk south past the flies and take Teleporter 8.
In the room in front of you, there should be an easily visible slate. Examine it and give it your password.
The Statue should now be activated. If not, you have probably accidentally given the slate an incorrect password, in which case you should repeat the instructions from step 2.
Party Mode: 6 Fort Garrisons
Story Mode: 3 Fort Garrisons
Button 5 Options - After Complete Statue 3
After completing this statue, follow the newly unlocked path down until you reach a pedestal. You will need to drop a short distance. Examine it, and select the first option. It does not matter if you do this multiple times, or if you change your response. This just saves time for...
Light Angel Statue 1.4 (4)
Location: Facing the Guardian Statue in the 4 ladders area (See Statue 2),take the top right ladder and follow the path. After climbing up the second ladder, the Statue will be easily visible (Map reference: I7)
Instructions:
Examine the Statue.
Go to the Password Generator (See Statue 2) and select the option with a 4 in it. It will spit out a 7 digit password that, like the password for statue 2, is both important and unique.
If you have not already done so, follow the newly unlocked path past Statue 3 down until you reach a pedestal. You will need to drop a short distance. Examine it, and select the first option. It does not matter if you do this multiple times, or if you change your response. (Edit: This switch is on/off. It changes the teleport location for teleport 5).
Facing the Guardian Statue in the 4 ladders area, climb the back right ladder and follow the path until you reach Teleporter 5. Use it.
In this new area, follow the path until you see a Pedestal. Use it, and select the first option. Like the Pedestal in step 3, it doesn't matter if you do this multiple times or if you change your response. (Edit: This switch is on/off. It changes the teleport location for teleport 4). If you try to move around in this area and you get moved somewhere unexpectedly and get a little message, you are going the wrong way.
Head to the Entrance. Take Teleporter 1, and take the first left (not the right). Use Teleporter 4 that is at the end of this path.
Follow the path until you find a slate (I'm afraid I cannot remember if you need to use additional teleporters to find it). Give it your password.
The Statue should now be activated. If not, you have probably accidentally given the slate an incorrect password, in which case you should repeat the instructions from step 2.
Note: After completing this statue, it will open the area directly behind statue 4. There is a pedestal that you will need to interact with to open statue 5. However, you will need to interact with statue 5 before interacting with this pedestal behind statue 4.
Story Mode: 8 Fort Garrisons
Party Mode: 4 Fort Garrisons
Light Angel Statue 1.5 5)
Location: Facing Statue 1, head backwards. It's near a group of frogs.
Instructions:
Examine the Statue.
In the area newly unlocked behind Statue 4, examine the Pedestal and select the first option. It doesn't matter if you do this multiple times or if you change your response.
The Statue should now be activated.
Party Mode: A Fort Officer and 4 Fort Garrisons
Isolated Hall (隔離された広間): Floor 2[]
Light Angel Statue 2.1 (6)
Location: From the Guardian Statue, follow the path through the frogs. At the end, the statue is easy to see.
Instructions: Talk to the statue, and tell it 72.
Party Mode: 10 Cracking Imps
Light Angel Statue 2.2 (7)
Location: There is a new area you can access if you turn right just before the little room with plants in. Use the Teleporter there. Close by, in a room with flies, there is another teleporter (Map reference: I9), that you use. From this watery area, take the left-hand route past the frogs, and the Statue is on the right. This area has a Guardian Statue in it.
Instructions: Collect 10Demon Toad Oil ('悪魔の蝦蟇油) from the Demon Bullfrogs (デーモンズブフォ) and give it to the statue.
Party Mode: Lost Troop
Story Mode: Lost Troop
Light Angel Statue 2.3 (8)
Location: In the watery area (See Statue 2), take the right-hand route past the flies. The statue is on the right near the Assassins (暗殺者).
Instructions:
Examine the Statue.
If you have 3 Silver Tokens (銀のトークン), skip to step 5. Otherwise, from the flies (ラウドマウス), plants (プレデタープラント) and Assassins (暗殺者), collect 25 Bronze Tokens (悪魔の蝦蟇油). There is also another method of getting Bronze Coins, detailed at the end of the instructions for this statue.
From the starting area, take the Teleporter as if heading to the watery area. Very close to where you appear, there is a Pedestal (Map reference: I8). Select first option (with a 10 in it) to give the pedestal 10 Bronze Tokens. If it has worked, you should see the symbol 狸 when you examine Teleporters here and not 狐. Do not use this multiple times, or you will have to find more Bronze Tokens to remedy your error.
Take the Teleporter to the watery area, head to the newly unlocked area behind Statue 2 and use the Teleporter there. If this takes you back to the starting area, repeat step 3.
In this room, examine the machine. Select the first option to convert 5 Bronze Tokens into 1 Silver Token (銀のトークン). Do this twice more so you have 3 Silver Tokens.
Return to the Statue. Right next to it is a machine. Feed it the Silver Tokens. This activates the Statue.
Party Mode: 12x Lost Troop Junior
Getting more Bronze Tokens (悪魔の蝦蟇油)
Once you have activated the Pedestal in Statue 2 step 3, follow step 4 as well. In this room, there is a character named Zahar (ザハール) with a big exclamation mark (!) above his head. Speak to him, and select the first option until he offers you a quest.
This quest requires you to kill 5 "Loud Mouse" (ラウドマウス) and 5 "Predator Plants"(プレデタープラント), for which he gives you 5 Bronze Tokens. You can do this quest multiple times by speaking to the character again and selecting the first option until he gives you the quest.
Note: For some reason the "Loud Mouse" (ラウドマウス) are not available in "Story" mode when the above described mission is "active". However, I found that the "Predator Plant" (プレデタープラント) behind Statue 2.2 and the "Assassins" (暗殺者) in the waterway by Statue 2.2 both drop bronze coins quite frequently and they spawn fairly quickly. You can easily run back/forth between the two mobs and collect all the needed "Bronze Tokens" (悪魔の蝦蟇油).
Light Angel Statue 2.4 (9)
Location: From the watery area, take the right-hand path, past Statue 3, and use the Teleporter at the end. The Statue is right next to you when you appear.
Instructions:
Examine the Statue.
If you have a Gold Token (金のトーケン), skip to step 6. If you have 5 Silver Tokens (銀のトークン), skip to step 5. Otherwise, collect 25 Bronze Tokens (悪魔の蝦蟇油) from the flies (ラウドマウス), plants (プレデタープラント), Assassins (暗殺者) or Quest detailed in Getting more Bronze Tokens (Just above).
If you have not already done so, follow step 3 in Statue 2. You will need an additional 10 Bronze Tokens to do so. If you have already done this, skip to the next step.
Head to the machine that converts Bronze Tokens into Silver Tokens (See Statue 2 step 4) and select the first option 5 times to get 5 Silver Tokens (銀のトークン).
Return to the main entrance to this floor. In a small room in front of the barrier that returns you to Floor 1, there is a bust. Examine it and select the first option to convert 5 Silver Tokens into a Gold Token (金のトーケン).
Behind Statue 3, in the newly unlocked area, there is a machine. Feed it your Gold Token. This activates the Statue.
Party Mode: 5x Fort Guard
Severed Corridor (途切れた渡り廊下): Floor 3[]
Light Angel Statue 3.1 (10)
Location: From the entrance to the floor, keep walking straight ahead.
Instructions:
Examine the Statue
Collect 30 Colourless Lumps(無色の塊) from the Kobolds (コボルドファイター), Goblins (ゴグールファイター) and Zulus (ダークズール).
From the Statue, start walking back to the second floor, but take the first right to the Guardian Statue. In the furthest right corner of this section, there's a little corridor. Follow it past the Goblins and Zulus, and turn right into another long corridor. This corridor has a couple of Gas Clouds in it.
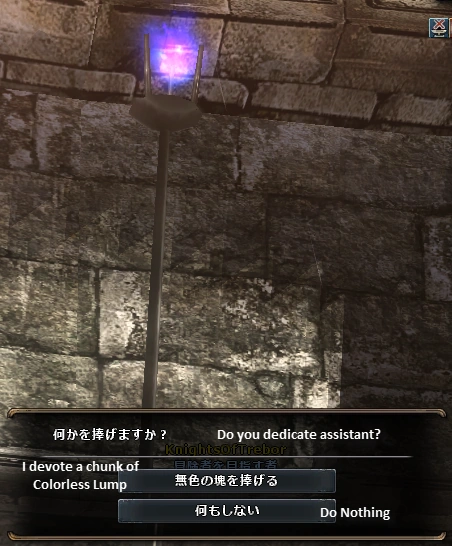
Turn in 3 Colorless Lump for Purple Ash
Take the first left to find a torch with a purple flame (Map reference: I8). Examine it, and select the first option to convert 3 Colourless Lumps into some Deep Purple Ash (紫の灰). Repeat until you have 5 Deep Purple Ash (紫の灰).
From the Purple Torch, turn left back into the long corridor, and take the second left to find a Torch with a light blue flame (Map reference: H8). Examine it, and select the first option to convert 3 Colourless Lumps into some Blue Ash (蒼の灰). Repeat until you have 5 Blue Ash (蒼の灰).
Turn left back into the corridor, then take the first right into a small room. Keep going straight ahead to find a fountain (Map reference: F7). Select the option to give it the Blue Ash ('蒼の灰)', then select 5. This should give you some Blue Spring Water(蒼の泉水).
Turn around and take the first right through a short corridor. In the left corner in front of you, there is another fountain (Map reference: E8). Select the option to give it the Deep Purple Ash (紫'の灰)', then select 5. This should give you some Deep Purple Spring Water(紫の泉水).
Return to the Guardian Statue. From the direction you just came from, keep going straight ahead to find a Statue of a Knight (Map reference: J8). First give it the Deep Purple Spring Water (紫の泉水), then the 'Blue Spring Water (蒼'の泉水). This should activate the statue.
Party Mode: 5 Inoverche Marauders
Story Mode: 3 Inoverche Marauders
If you, as I did, have the problem of Japanese characters not displaying properly and being swapped with random symbols for this statue: Open your quest log and select the rightmost tab. Hover your mouse over an item to see what it's called, and compare it with the options you are actually seeing. It's slow, but it works.
Light Angel Statue 3.2 (11)
Location: In the newly unlocked area behind Statue 1, follow the path and take the first left. The statue is right in front of you.
Instructions:
Examine the Statue.
Facing the Statue, look to your right. There's a slate here (Map reference: I6/I7). Examine it, and select the first option (平穏なる一日).
Facing the Statue, head backwards. Take the second right (not back to statue 1), to enter a room with a single Assassin (暗殺者). Examine the slate in here (Map reference: J5/J6) and select the second option (午餐).
From this room, head out the only exit, walk through the room with kobolds (コボルドファイター) to find a watery area. Head to the left and head through the small passageway to find a third slate (Map reference: H6/I6). Examine it and select the second option (天空の星).
The Statue should now be activated. If it instead blows up in your face, you've pressed one of selected an option incorrectly and need to start again from step 2.
Party Mode: 5 Inoverche Spawn
Story Mode: 3 Inoverche Spawn
Light Angel Statue 3.3 (12)
Location: In the newly unlocked area behind Statue 2, follow the path. In the room at the end, walk around the wall in front of you (taking care not to be hit by the sleep trap), and use the Teleporter. From this room, take the only exit on the right, take the first left then follow the path. Turn right just as you enter the room with the golems, and the statue is straight ahead of you.
Instructions:
Examine the Statue.
Walk back the way you came, and speak to the person named Ivan (イワン) on the second left (Map reference: E4). After his monologue, he will tell you a number and give you 10 Mechanical Oils (調整油). If you didn't catch the number, speak to him again and he'll tell it to you again.
From Ivan (イワン), turn left, the left again to get to a room with a Guardian Statue and a machine. Examine the machine.
Solving the Machine
The machine gives you a number. Your aim is to get from this number to the number Ivan gave you in exactly three turns. It then gives you a series of options:
The option with a 1 in it (少し上げる) uses 1 oil, and increases the machine's number by 2.
The option with a 2 in it (普通に上げる) uses 2 oils, and increases the machine's number by 5.
The option with a 3 in it (大きく上げる) uses 3 oils, and increases the machine's number by 8.
The option 下げる decreases the machine's number by 4. (Not always available)
The option わずかに下げる decreases the machine's number by 1. (Not always available)
The final option is always cancel.
If you don't like the number the machine gave you, or you failed to get it right, you can speak to it again to get a new number to start from. Logging out or leaving the number means you need to speak to Ivan again.
Example of how to solve: Machine's number is 22, target number is 40.
Turn 1: Option 3, increases number to 30
Turn 2: Option 3, increases number to 38
Turn 3: Option 1, increases number to 40
4. Return to Ivan, and speak to him to get a key.
5. Head back to the Statue and select the first option.
If you need more oil, there is a person at the end of the long corridor with gas clouds (See Statue 1) who sells more for 1,000 G a piece.
Party Mode: 5 Inoverche Doomslayers
Story Mode: 3 Inoverche Doomslayers
Light Angel Statue 3.4 (13)
Location: Follow the newly unlocked path behind Statue 3, use the teleporter, and the statue is on the left in the room you come to.
Instructions:
Examine the statue. Select the first option, then the last option.
Collect 10 Pagan Medals (異神の紋章) from the Assassins (暗殺者)
Near the Fountain that you gave the Purple Ash to in Statue 1, there is a Statue of Death. Give it the 10 Pagan Medals.
Return to the Statue, select the first option, then look for マカブラ. There are a lot of very similar looking options. If you can't see it, press the second last option for more options.


