- Main article: Dungeons
Recommended Level: 17 Party Size Limit: 4
How to Unlock[]
- Minimum Soul Rank Required: ?
- Required completion of Dungeon: Temple of Oblivion
(how to unlock guide goes here, which is typically what the player does in Town to unlock it)
Maps[]

Old Underground Sewers Path to Basement 2 - Floor 1.5

Old Underground Sewers Path to Basement 3 Lower - Floor 2.5

Old Underground Sewers Path to Basement 3 Upper - Floor 2.5


Old Underground Sewers Basement 1


Old Sewers Basement 2


Old Sewers Basement 3

Wizardry Online Old Sewers to Underground Ruins run
NPC List[]
| Name | Location |
|---|---|
| Rosemary | Floor 1 - F2 |
| Dirty Aristocrat Elizabeth | Floor 3 - F8 |
| Friendly Monster Jiminy | Floor 2 - J4 |
| Royal Lady Ilshanti | Floor 3 - C9 |
| Survey Member Dorvacos | Floor 3 - C9 |
| Former Adventurer Kurt | Floor 3 - C9 |
| Boy Ardanis | Floor 3 - C9 |
| Royal Lady Sellafile | Floor 3 - C9 |
Related Quests and Missions[]
- Kobold Hunt 3
- Screams of the Departed Return
- Sewer ways cleaning
- Sewer ways cleaning 2
- Sewer ways cleaning 3
- Mad Soldier 2
- Revenge to Demihumans 2
- Demihuman´s Sabat
- Sewer Thieves
- Wicked 2
- Lost in the Abyss
- Fetishist Melancholy
- Wriggling Bugs
Statue Riddles[]
Material Checklist[]
All materials required to complete this dungeon are listed below. They are dropped by specific enemies populating the dungeon, but most can be traded or sold in player shops or the auction house.
| Item | Amount | Requied for | Dropped by | Notes |
|---|---|---|---|---|
| Blue Medal | 1 | Floor 2 Statue 2 | machine dispenser | it costs 100gold to get a random medal, most are fake versions and cost a lot of gold if you're unlucky |
| Green Medal | 1 | Floor 2 Statue 2 | machine dispenser | it costs 100gold to get a random medal, most are fake versions and cost a lot of gold if you're unlucky |
| Yellow Medal | 1 | Floor 2 Statue 2 | machine dispenser | it costs 100gold to get a random medal, most are fake versions and cost a lot of gold if you're unlucky |
|
(Only Non-Porkul characters) |
3 | Floor 3 Statue 1 | Born Sucker (Floor 3) | Not needed if you are a Porkul |
|
High Quality Alcohol (Only Porkul) |
5 | Floor 3 Statue 3 | Bushwacker (Floor 3) | For Porkuls only |
|
(Only Porkul) |
1 | Floor 3 Statue 3 | Practicus (Floor 3) | For Porkuls only |
Floor 1[]
- Statue 1
- For this statue you need 1 Balboa coin. You get this item by completing the task from Rosemary who can be found at F2 (ask for work).She will send you to collect debts from People.
- The first one is directly on the other side where Lady Rosemary is. Jump down the hole and follow the way. Talk to NPC Bart and choose "draw weapon", then he will talk about another NPC Jeffery. There is a teleporter just near NPC Bart which ports you back to the start. Go straight from there and you will find the next guy (NPC Jeffrey) in a big room. Mention the woman he left back and he will give you the debts. After you did this, you have to go back to Lady Rosemary and receive your reward and the coin. Insert the coin and go into the fight. (Money wont work)
- Enemies: 5x Blue Feather
- These are mage type mobs (similar to Novice Mage from Deltis Keep). The fireball does not track, so circle strafing from a distance will prevent fireballs from hitting you.
- Statue 2
- You have to find the 2nd Statue and then go back to Rosemary to receive another quest ( ask for work ). Again, you have to collect debts from people. Curtis is located at J7 and to get to him, you have to go under the bridge past the stingers, near the coins, and then go into the gate leading to the sewers. Then turn right (Near the purple mob Silverfang in Caligrass where you found one of the screws). Tell him "you cant ingore that you saw him" and you will get a wedding ring from him.You have to go back to Rosemary again. Either you use the teleporter next to him , which costs 10,000 Gold or you go back and use the one near the 1st Statue. Report to Rosemary, receive the Balboa Coin and go into the 2nd Final battle.
- Enemies: 10x Blue Feather
- Statue 3
- No Riddle
- Enemy: 1x Baby Adrian
- This Monster deals a lot of damage (100-200 each hit, even to high defense fighters). One strategy is to have a mage, fighter, and priest (priest optional but helps survivability a lot). The fighter gets the aggro and runs in circles.The mage casts poison and stands in the middle. If the monster aggros the mage, the fighter uses provoke to keep aggro. It helps to be under max weight to kite this monster, the fighter won't need to equip a weapon. Extra heals and defense buffs from a priest will significantly help the fighter not die. Even a level 12 trap thief can do 2800 damage with poison/cut/bomb.
- Statue 4
- You have to find out the days needed to collect all the gold.
- Answer: 586
- 10,000 Gold = 1 day Have to collect 10,000 gold, 50,000 gold and 100,000 gold
- 20,000 Gold = 2 days
- 30,000 Gold = 4 days
- 40,000 Gold = 8 days
- 50,000 Gold = 16 days (always double the days for every 10,000 gold)
- Enemies: 10x Gorde Zombie
- Do not let the name fool you these are actually large kobolds and you cannot simply lure them one at a time. So far best strategy is just a head on fight so have a good fighter. Or have a trapper thief enter and weaken them as if he is soloing the statue and then have the whole party enter and kill them. This will make this statue extremely easy.
- Statue 5
- Jump down the hole at left/upper corner (ther side where Lady Rosemary is) and follow the path and pass some mobs, you will finnally reach the statue. You have to find out the number of how many times he has to beat the writer up to get his money. The actual riddle is on a slate in the sewers ( near the place you found Curtis).
- To know how much pain i can withstand, get the sum of the legs of a human, a spider, an ant and take it the amount of the eyes of a dog.
- Answer: 32
- Enemies: 10x Catapult Soldier
- Statue 6
- No riddle
- Enemies: 10x Fatty Head
- These Toads can lick you to death.Use the same strategy as at Baby Adrian. But this time the Fighter lures one monster and fights it while the others run.They can do a lot of damage (50 per hit) and have high health, so be sure the priest can heal you.
Floor 1.5[]
- Statue 1 (7) Located at J3
- As soon as you enter, go straight ahead and drop through the hole behind the fire traps. Turn right and take the first stairs on the left. Follow the path to the statue (map square J3) and speak to it. Go back down the stairs, turn right, and keep following the path. Examine the 3rd skeleton at map square G3. Return to the statue and say how many people the bunny killed.
- Answer: 4
- Enemy: 1x Crazy Jumper
- This boss is just a named goblin soldier. Nothing special
Floor 2[]
- Statue 1 (8)
- To unlock the first statue you need water of Life. Talk to the statue and then to Helmut , the NPC near the statue. He will talk about an alchemist (Location: H3, a small room with gate; from daredevils room ahead to revive statue and then turn right, and then follow the path)you have to search. This alchemist is located at the opposite direction where the room with the daredevils are. He will say that he wont create another Water of Life but he mentions the ingredients so that you can make it yourself. You don't have to find the ingredients. You can mix the potion at a tablet on the right side of the room where the Daredevils are (caution: sleeping gas before the room and 1 daredevil in the room). The correct item will be called Prismatic Liquid. After you get prismatic liquid go ahead to the statue and unlock it.
- Note:there are two paths to alchemist. One path is not shown in map; just opppsite direction of daredevils room and pass bisonhead; straight go north. Another way, need pass erasers and turn right before statue3 and then follow the way.
- Answer: Mix [Nails of the great] with [insane fruit].
- Enemies: 9x Dead Leafs
- 1x Mad Farmer
- Dead Leafs and Mad Farmer both apply debuffs. Dead Leafs can use Warzen blow, dealing massive damage when debuffed. In addition, if too close to Mad Farmer, he can use a stun attack (6s stun) which is usually followed up by a charge attack which will 1 hit your FIG if you are not careful.
- Note: If you get error mixed potion, discard it then you can mix again.
- Statue 2 (9) Located at K8
- After you beat the statue you will find some "buttons" in which you can trade 100gold for a coin. Each "button" will give you dummy medals, as well as 1 color of medal. Keep putting in money until you receive the appropriate medal (Blue, Yellow, or Green). There are 3 total "buttons" which give different medals. There is an NPC (Jiminy, Friendly Monster) with which you can trade those you dont needed for final battle. You will need 1x Blue Medal, 1x Yellow Medal, 1x Green Medal to unlock the statue.
- Machine 1 location: F6 (green)
- Machine 2 location: E7 (yellow)(in a small room with door just after you climb down a ladder)
- Machine 3 location: E3 (blue)
- NPC Jiminy (I4): trade 3 Aqua medals for 1 yellow medal; 3 Purple for 1 blue (3 Orange for 1 green?).
- You can also get the correct colour medals by trading them with Jiminy (A Goblin NPC near the 3rd machine)
- Final battle in the room where the daredevils are (to the left) first button F6 second E7 Third I3
- (Managed to get 2 color i required from 2nd statue. Not sure if they got different frequency, but i spend 10k on 1st statue without result, around 2.5k on second and 3rd medal appeared on 1st try)
- Answer: Blue, Yellow, Green (in that order)
- Enemies: 8x Variable Metal
- Stininus x3
- This is very much like the millionaire boss from Aria, except with thieves thrown in. The 3 thieves use paralyze and the coins stun for significantly longer (not to mention hit harder) than their bride counterparts in Aria.
- Statue 3 (10) Located at i5
- At first you have to speak to the statue (it is left from where the Bisonhead is). He will tell you to search a familiar (animal companion) similiar to his kind. These items are in Piles in the dark areas you unlocked (Daredevil room). The one needed is the bird. From statue 2 above go through the opening to the left make a left and follow to I9. The pile is located after a closed door where has some Erasers. You need to dash and jump in the same time to across a big gap.
- Note: In the dark area, there are three piles containing the cat, butterfly and bird.
- How to make a big jump: Run then Dash then Jump, Dash+Jump at the last moment near the gap. If you've never done it before, you should consider practicing. Dash jump is different from walk then jump.
- Enemies: 10x Dark Flyer
- It's pretty hard statue due that Dark flyers can hit pretty hard. Even hard enought for lvl28 knight in sr8+ gear forget to 6+. So either have good tank and heal, or ask high-level firends. Also worth mentioning that they can fly over traps without triggering them.
- Dark flyers also cast petrify and when they do, the swarm of gargoyles that they are usually takes you out.
Floor 2.5[]

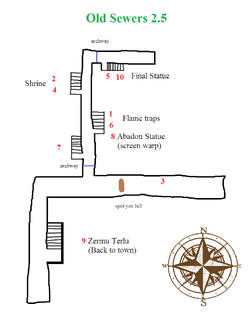
Old Sewers 2.5 Objectives Map
Statue 1 (11)
Location: K3(of basement 2 - only can enter through floor 2-3 at G5)
From the start of this floor, head forward until you come across a set of doors. Open them and take the left (a lone Kobold will be here) and continue until you reach a gap in the floor. Jump down to the sewers and take the left path (travelling away from the Bull). You will quickly come across a fork (one going forward and one going right). Turn right at this fork and continue down this corridor.
This corridor features 4 seperate staircases (2 on the left and 2 on the right). You will need to visit each one at specific times to complete the objectives required to unlock the Dark Angel. Below is a quick reference for each stair, followed by a step by step guide:
- First staircase on the left (referred to as Stair 1): This staircase will be visited last (contains a polishing machine)(Stair location:G6)
- First staircase on the right (referred to as Stair 2): Sam (porkul NPC) and spring and dark statue can be found here (near Silverback)(Stair location:G5 in sewer)
- 2nd staircase on the left (Referred to as Stair 3): Revival Shrine and Gear location(Stair location:G4)(Wrecked machine)
- 2nd staircase on the right (referred to as Stair 4): Machine to power polishing machine (path to floor3)(near Bisonhead)(Stair location:G3)
Note: a staircase at E8 guarded by a Bisonhead will leads to a revive statue and path back to OS2.
Reference map:(Note the following map need rotate 90 degree; H3 up, G7 down)
pile H7 (tool)
|
|G3 |G5 |
pile H3 --+++++++++++++++++++| G7 Poison area
|G4 |G6 |
|--E8
Stairs: E8, G3, G4, G5, G6
E8: back to OS2 (revive statue when you come from OS2)(stair0)
G3: to condenser machine (need turn on for grinder) and horse statue(H2); path to OS3(stair4)
G4: to revive statue; wrecked machine(I4)(stair3)
G5: to NPC SAM; spring; to quest dark statue (in OS2; take path to OS2)(stair2)
G6: to grinder machine (stair1)
H3,H7,C7?: dead ends with piles (opposite of H7 is another dead end?)
NOTE1: write down the traveling path may help you a lot, do it by yourself for better understanding.
NOTE2: If you want go to G3 from G5 (G5->G3), just go north(up).
Note: Since this is soul level quest, you may use alter role in town to report the quest from Arcanum, then switch back for saving a long run.
First go head to Stair 2 (aka the 1st staircase on the right). Turn left after the stairs and follow the path until you find a Porkul called Sam. (Ignore the new area accessible on this floor, you will go there later). He will give you a quest to find a Gear.
Second go head to stair3. Now return to the sewers and turn right to continue down this corridor and take Staircase 3 (which is the next staircase on the left). Here take the revival shrine and continue ahead up some steps and through a room to find a ladder at the back. The ladder is usually guarded by 2 bulls so its best to cause a distraction first or to stealth through. Climb the ladder and carry on to the end to find a machine. Examine it and you will be prompted to find a tool to fix it.
Return to the sewers and turn right and backtrack through the corridor all the way to the start at the other end. At the fork, turn left to where you originally fell down from the hole. This time, Run past the Bisonhead to a dead end. Examine the Junkpile you find here for a Wrench.
Now backtrack to the start of the corridor with the stairs and go to the 3rd Staircase (aka the 2nd Staircase on the left with the revival shrine). Climb back up the ladder here and examine the machine to retrieve the Valuables Rusty Gear using the Wrench. Now return to the sewer, turn right and take the next staircase back to Sam.
After speaking to Sam, he wants the Rusty Gear polished. Head down to the sewer again and turn right and continue down to the end (past Stair case 3 where Revive shrine was) and carry on down to Stair 4 (the next staircase on your right) guarded by a Bisonhead. Go up these stairs and turn right immediately to a machine. Examine it and you'll take a little damage in return for powering the polishing machine.
Head down to the sewer again and turn left and backtrack to the start of this long corridor to take Stair case 1 (in this case its the furthest staircase from your current positon). This is the only Staircase that you have not visited yet. Follow this floor and take a small corridor into a new room. Here you will find the Polishing machine which you have already turned on earlier. Examine the machine and polish it to get the Shiny Gear.
Now return to Sam again (Staircase 2) to complete the quest. He will reward you with fragments (used to unlock the Dark Angel Statue).
Next head towards the sewers, but take the path to the new area that you ignored earlier (just behind 2 fire jet traps). In the new area, continue to the fork and turn left to find the Dark Angel Statue.
The enemy is the one needed for the quest from the Arcanum.
After completing this battle, return to town and visit the Ministry where you will be given a key to unlock floor 3. When you have that key, return to the sewer corridor and take Stair 4 (aka the 2nd staircase to the right guarded by a Bisonhead). continue down this area to find a horse statue, insert the key and you will unlock floor 3. Don't forget to activate the teleport there.
- Alternative directions to Sam.
| Alternative directions to Sam |
|---|
bottom sewer grid area to get to res stone in G = g4 This will take you to I4 I4= machine grid g6= lower sewer grid to get to grinder h6 = grinder wrench = h7 in sewer grid |
- Enemy: 1x Abadon
- Statue 2 (12)
- Location: H2
- No riddle, no fight.
- After completing the quest for Arcanum they will give you the crystal needed to pass the statue and a new quest.
- This statue is located just north of where you actived the power.
Floor 3[]
- Statue 1 (13)
- Location: H3
- First you have to go to the great hall with the 4 NPCs. They will tell you you need a bronze medallion to enter the battle.There are two ways to get this.
- For Porkuls: crouch-walk trough the place where Gariel (H9) is and it will be the item hidden in the pile of rubble.
- For all others(non-Porkuls): Talk to Gariel and he will give you a quest to get the corset of the NPC Elizabeth. Getting to her is extremely annoying. Go to the room with the 4 NPCs and stick to the right wall, there is a tiny staircase hidden VERY well. Proceed and you will eventually find Elizabeth. She will sell her corset for 3 Aristocrat Coins. These can be obtained by chest or coin monsters "Born Sucker" just near her. Don't be confused by the imitation Aristocrat Coin that is a mission reward for beating several of the Aria boss statues.
- Note (non-Porkuls): You can try to buy 3 Aristocrat Coins from players, from player shops or from the Auction House, or even from your union's storage.
- Enemy: 1x Great Zagzwell
- 4x Eternal Attendant
- Statue 2 (14)
- Location: C5
-
- First you must travel beyond the first arena through a nearby door and eventually find your way through the winding path to a "Secret" passage on the right hand side that is sometimes covered by poison. Travel beyond this opening and you'll find a receptionist asking for a silver medallion. To locate "Secret passage" (E5|E6 boundry in map Old Sewers Basement 3), you will pass a posion area first, then travel into a room with two shelves occupied by a lot of human-like/magician monsters, the secret passage is just between the shelves (turn right here). By the way, you will run into another poison area, after that you can find the receptionist. If you miss the secret passage, you may find out that you had taken a round trip. Run back to the wooden jumping bridge and drop down to speak with the porkul Graham (G7) there. He'll ask for a model ship (see following sentence first). Go to the beginning of the 1st room at the begining of the floor, take the right at split and Zararn will be to your right. Open the second door on the right and talk to the NPC Zararn (I6). He'll ask for a membership card. If you don't have the membership card yet, return to the sewer where you farmed Aristocrat coins and take your first two rights looting the shiny skeleton corpse you come across for the membership card. The shop NPC Zararn will ask you to find the reseller of the model boat. Return to the porkul Graham desiring the boat and enter the dark area found next to him. Hang your first two lefts and it will bring you to the reseller, an NPC Reseller Solneik (G8) in the dark area will give you a model ship. Grab the model ship from him and turn it in to the porkul Graham. He will award you with the silver medallion required by the receptionist.
- Porkuls do not need to do this, and can instead take a left where they got the bronze medallion, go through the dark maze and exit out the other side (or drop down from the small bridge jumping section), and go through another vent next to one of the two Porkul brothers.(porkul Graham (G7) under bridge)
- Enemy: 1x Brother Jumbal
- x1 Brother Bozatt
- Statue 3 (15)
- Progress through the dungeon until you find the receptionist who requires a Gold Medallion to progress, and a little further ahead there is a revival statue. Go back and talk to the very first porkul "Gariel" (H9) of the dungeon (located next to the crouch area for the bronze medallion - the porkul who gives you a quest to get the corset) and he will tell you Medalia has it. Make your way to the 1st Arena and into the sewers (hug the right side inside the arena one room to find the sewer entrance). To find the woman Medalia you need to take your first right, then left, and then left again to get to where you should have previously farmed the coins (Note: this time just go straight and follow the path until the dead end, and then turn right, a passage way is located there). But, when you get to the turn where the Coin farming NPC is to your left, you instead go right and then take your next three lefts. The third left will lead to a dead end, but tucked away in the corner of the dead end is a passage way. Follow the passage way to the top and take a left at the fire trap. Regular folk press on down the hall way to its end following the natural turn of the hall way past tons of coin mobs. Finally, get to the tavern type place, and find the NPC you are seeking (Medalia). The answers to her questions are "Hersant Premium Brandy" and then "Salted tongue of Minotaur". She will then hand you a broken ring. After that she will ask you to pay the bill (you can answer yes or no. If you say yes, you pay almost 14k gold, if not the guards will kick you out. So choose yes. You cant do this without have enough money!). Go back to Arena one, talk to Rodrio , give him a thousand gold or so to fix Medalia's ring. Return to Medalia and then you will get the Gold Medallion. Take the medallion way back to the receptionist and enter the battle with The Lesser Demon and some zombies.
- Porkuls: Take the path described above to Medalia. Run past the Born Suckers, and attempt to enter the adult only area, after being denied access through a cutscene, speak to the man next to the door, then run back past the Born Suckers and take the first right to find a human male named Velonat. He wants you to bring him five High Quality Alcohols. Once you have bought him his booze, he will ask you to speak to Rodrio to get a Diamond Ring. Rodrio is located in the 1st arena just to the west of the Dark Angel Statue. To make the ring, he needs you to obtain a Gold Ring from a Practicus and a diamond which you can get by buying a Diamond Knight Statue (can be traded) from Zaran. Zaran requires you to get an Underground Shop Member's Card before he will allow you to buy anything. The card can be found by taking the first two right turns when entering the sewers to get to Medalia. Return to Rodrio to get the diamond ring, and return to Velonat. He will finally ask for 20,000 gold. Once this is paid, you will be given the Gold Medallion. Note that if you die after paying the gold but before recieving the medallion you will have to pay again.
- Note: The directions above, from the 1st Arena room, through the sewers, to the dead end with the tucked away passage, are incorrect. If a 'left turn' is choose-left (you can go left or right, you choose to go left) instead of force-left (there is no way to turn except left) and a 'right turn' is choose-right, then the directions are: At the bottom of the stairs, turn right. Then left, then left, then follow the right hand rule to the dead end. The tucked away passage is at the end of the dead end, on the right.
- Or: From the bottom of the stairs to the tucked away passage: Choose: right, left. Force: right, left, right, left. Choose: left. Force: right, left, right, right, right, left. Go straight to the dead end.
- Note: For running in sewer to lady Medalia: Go down the sewers, then turn right instantly, then turn left and follow the path until you reach a T-shaped road cross. Turn left, then pass coins/posion traps and go straight forward (stealth or decoy the coins if you can). (A lot of players die here as a result of getting poisoned by the traps and blocked off by the coin monsters. This is the most dangerous part of the sewers.) After the coins, find a safe spot to recover your HP and refresh your stealth/decoy cooldown. Then try to decoy the next coins or pass through with stealth, then follow the path until you reach a dead end, and then turn right; there is a passage way. Of course, you need prepare some antidotes beforehand.
- Enemy: 1x Lesser Demon x4 Dark Thing
- The Lesser Demon is fast, shoots fire balls, and does pretty mean damage to those who are under geared. So, make sure you have some SR 5 stuff.
- Statue 4 (16)
- Press on past the jumping puzzle bridge and talk to the NPC at the end of the corridors. He'll equip you with the item to access the statue.
- Enemy: 3x Mechanical Guardian
- The statue fight has three very large knights. Watch out for the typical Knight attacks and they'll be easy to eliminate.
- Return back to town to turn in your quest to the Ministry of Arcanum. You will now be granted access to the Underground Dragoon Ruins, which is located at the very end of the Old Sewers.
- Note: You can jump down wood bridge to a shelf against the wall, then travel to the teleport pole for back to town fast.
- Note 2: When you want to travel to Underground Dragon Ruins, remember to accept some repeatable missions from guild first, you need run a long distance from Old Sewers to there.
Subdungeon: Underground Dragoon Ruins[]
- Please visit Underground Dragoon Ruins (UDR) for information on this dungeon.
Caches[]
| Name | Key | Drops | Location and Notes |
|---|---|---|---|
| Mob Chest Old Sewers - Basement 1 |
None |
Old Sewers F1 Mob Drop | |
| Dungeon Chest Old Sewers - Basement 1 |
None |
|
Old Sewers Random Spawn
|
| Mob Chest Old Sewers - Basement 2 |
None |
|
Old Sewers F2 Mob Drop |
| Dungeon Chest Old Sewers - Basement 2 |
None |
|
Old Sewers Random Spawn |
| Mob Chest Old Sewers - Basement 3 |
None |
|
Old Sewers F3 Mob Drop |
| Dungeon Chest Old Sewers - Basement 3 |
None |
|
Old Sewers Random Spawn |
Note: Chests may be empty, even the ones requiring keys.
Creatures[]
| Name | Mob Type | Exp | Special Attack | Item Drop | Location/Remarks |
|---|---|---|---|---|---|
| Gem Box | Beetle |
|
| ||
| Stinger | Fly | 1226 |
|
| |
| Zule Soldier | Zule | Beat |
|
| |
| Black Widow | Spider | 1315 |
|
| |
| Collector of Hell - Levi Machine |
| ||||
| Man Eater | Fly | 1645 |
|
| |
| Bloody Marble | Zombie | 1490 |
|
| |
| Donchucky |
| ||||
| Aloof Seeker Curse | 5690 |
|
| ||
| Blue Feather | Flame Arrow |
|
| ||
| Creeping Coins | 314 |
|
|||
| Fatty Head | 852 |
|
| ||
| Baby Adrian | 1639 |
| |||
| Eraser | 877 |
|
| ||
| Vorpal Bunny | 400 |
Critical hit (Instant kill) |
|
| |
| Catapult Soldier | 763 | ||||
| Crazy Jumper |
| ||||
| Silverback | Kobold | 1599 | Charge Attack |
|
|
| Bisonhead | Minotaur | 4168 |
|
| |
| Zule Fighter | Zule | 1602 |
|
| |
| Daredevil | Fighter | 1395 | Armor Break |
|
|
| Dead Leaf | 312 |
|
| ||
| Kobold Soldier | Kobold | 1454 | Charge Attack |
|
|
| Gorde Zombie |
| ||||
| Gargoyle Warrior | Goblin | 1185 |
|
| |
| Mad Farmer | 6383 |
|
| ||
| Stininus | 1838 |
|
| ||
| Variable Metal | 259 |
|
|||
| Dark Flier | 828 |
|
|||
| Deathralva |
Rare Monster |
1681 |
|
| |
| Abadon | 7500 |
|
| ||
| Mercenary | Fighter | 2020 |
|
| |
| Barbarian | Bruiser | 2239 | Gangster Kick |
|
|
| Bushwhacker | Rogue | 1775 | Get Paralyzed |
|
|
| Practicus | Mage | 1607 | Flame Arrow |
|
|
| Born Sucker | Coin | 1423 |
|
| |
| Great Zagzwell | 8270 |
| |||
| Eternal Attendant | 1044 |
|
| ||
| Mickey | Rogue |
|
| ||
| Brother Bozzatt | 3360 |
| |||
| Brother Jumble | 5591 |
| |||
| Lesser Demon | 16,181 | Flame Arrow |
|
| |
| Dark Thing | ?? |
|
| ||
| Mechanical Guardian | 2784 |
|
|