[[File:DiabolicalBlacksmith.jpg|thumb|The "Diabolical Blacksmith" from Hell!]]
[[File:DiabolicalBlacksmith.jpg|thumb|The "Diabolical Blacksmith" from Hell!]]
*We'll just call him '''"'''[[Vie Pradesh Cordova Karma Seo|Vie]]'''"''' or "Demon Blacksmith" for short...
*We'll just call him '''"'''[[Vie Pradesh Cordova Karma Seo|Vie]]'''"''' or "Demon Blacksmith" for short...
−
*You'll want to speak with [[Vie Pradesh Cordova Karma Seo|NPC Vie]] and choose '''Option 1 - "I want you to make a saw diabolical"'''. He won't give you the time of day until you speak with [[Jousani|NPC Jousani]]
+
*You'll want to speak with [[Vie Pradesh Cordova Karma Seo|NPC Vie]] and choose '''Option 1 - "I want you to make a saw diabolical"'''. He won't give you the time of day until you speak with Inoverchi [[Jousani|NPC ]]Giovanni.
|-
|-
! scope="row" style="text-align:center;" |8
! scope="row" style="text-align:center;" |8
Line 539:
Line 539:
Jouasoni-Dialogue2.jpg|NPC Jousani - Dialogue Box
Jouasoni-Dialogue2.jpg|NPC Jousani - Dialogue Box
</gallery>
</gallery>
−
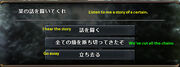
*Speak with [[Jousani|NPC Jousani]] and choose both dialogue '''Option 1 - "The Taso friend of yours is worried"'''.
+
*Speak with [[Jousani|NPC ]]Giovanni and choose both dialogue '''Option 1 - "The Taso friend of yours is worried"'''.
−
*Speak with [[Jousani|NPC Jousani]] again and choose '''Option 2 - "It introduced me to the craftsmen make the saw diabolical"'''
+
*Speak with [[Jousani|NPC ]]Giovanni again and choose '''Option 2 - "It introduced me to the craftsmen make the saw diabolical"'''
−
**'''''<span style="font-size:1.6rem;">Note: If both dialogue options are not present initially, you may have to speak again with [[Jousani]] immediately or you'll need to speak with [[Vie Pradesh Cordova Karma Seo|Vie ]] one more time before the 2nd dialogue option becomes available (see pics in slideshow).</span>'''''
+
**'''''<span style="font-size:1.6rem;">Note: If both dialogue options are not present initially, you may have to speak again with Giovanni immediately or you'll need to speak with [[Vie Pradesh Cordova Karma Seo|Vie ]] one more time before the 2nd dialogue option becomes available (see pics in slideshow).</span>'''''
|-
|-
! scope="row" style="text-align:center;" |9
! scope="row" style="text-align:center;" |9
Line 933:
Line 933:
*Make your way back to [[Hell's Square]] ('''Hint: Taking the [[Teleport Pole|Gold Teleporter]] to Floor 2 and and using the teleporter in that room will take you right back to the entrance of [[Hell's Square]]''').
*Make your way back to [[Hell's Square]] ('''Hint: Taking the [[Teleport Pole|Gold Teleporter]] to Floor 2 and and using the teleporter in that room will take you right back to the entrance of [[Hell's Square]]''').
*Speak with [[Giovanni|NPC Giovanni]] (Hint: Just choose all dialogue options)
*Speak with [[Giovanni|NPC Giovanni]] (Hint: Just choose all dialogue options)
−
*Speak with [[Abigoru|NPC Abigoru]] (similar to large [[MovingCitadel]]) and give it (15x) [[Dripping Heart|(15x) Dripping Heart]].
+
*Speak with [[Abigoru|NPC Abigoru]] (similar to large Toy Soldier or moving Armor) and give it (15x) [[Dripping Heart|(15x) Dripping Heart]].
*Speak with [[Abigoru|NPC Abigoru]] again and choose the new option in the dialogue.
*Speak with [[Abigoru|NPC Abigoru]] again and choose the new option in the dialogue.
*Speak with the Demon Blacksmith and he will send you off to find a Sacred Log
*Speak with the Demon Blacksmith and he will send you off to find a Sacred Log
Line 1,138:
Line 1,138:
|Go to Hell's Square
|Go to Hell's Square
|
|
−
*Head back to Hell's Square and speak with NPC Giovanni (ジョバンニ) and ask him the last question on the list that translates to "I'm looking for a cook".
+
*Head back to Hell's Square and speak with Inoverchi type NPC Giovanni (ジョバンニ) and ask him the last question on the list that translates to "I'm looking for a cook". (note: this NPC DOES NOT have a leave option like the other NPC's do. SO choose the very last option "I'm looking for a cook").
−
*Speak with NPC Nisuroku (ニスロク)
+
*Speak with NPC Nisuroku (ニスロク) (the fattie mob type)
*Acquire Recipes
*Acquire Recipes
**You can either buy the recipes from NPC Nisuroku (ニスロク)... OR
**You can either buy the recipes from NPC Nisuroku (ニスロク)... OR
−
**You can search the three toilets you came across througout the dungeon
+
**You can search the three toilets you came across throughout the dungeon
−
*Speak with NPC Merukomu (メルコム) to learn how to cook the recipes you acquired. You will need (2x) Dripping Heart for each recipe book.
+
*Speak with the Gargoyle type NPC Merukomu (メルコム) to learn how to cook the recipes you acquired. You will need (2x) Dripping Heart for each recipe book.
A pathway has been found to the Dark Roundtable, a mysterious ruin filled with unimaginable danger.
Humans fear to tread in these ancient ruins as the descendants of the Dark Angels lurk deep inside. Some think the Dark Angels themselves have been sealed somewhere nearby, but there's no way to be sure. All we know is that few return from here.
According to some, the Nine Brothers of Hell are headed to the roundtable in the deep of the ruins on orders from the Princess of the Dark Angels. Who knows what dark and evil scheme she seeks to enact?
If you are SR7, speak with Zermu Terlu again to receive the new story-line quest for Dark Roundtable and the required permit.
Maps
Insert maps here.
Related Quests and Missions
Quest
Client
Level Required
Soul Rank Required
Notes
The Nine Brothers of Hell Return
Zermu Terlu
-
7
Prevent the resurrection of a powerful Black Angel at Dark Roundtable
Material Checklist
All materials require to complete this dungeon are listed below. They are dropped by specific enemies populating the dungeon, but most can be traded or sold in "player shops" or the "auction house".
Note: The checklist is now complete, however the mats for the 9th statue are included because the recipes and the mats are randomly chosen and will differ from player to player.
If this is the first time defeating this statue, you are unable to leave the instance until the mobs or your entire party has perished.
Mob is fast initially but slows down considerably when it is close to death.
Mob explodes upon death causing severe damage to those in range. Use ranged attack for final blow or kite mobs through traps using dash to avoid AoE explosion.
Dark Angel Statue 1.1 - Detailed Steps
Step
Action
Action Details
1
Talk to the Surname of Dark Angel (Location: K3)
Surname of Dark Angel (Location K3)
Go to the location for the first Dark Angel Statue and speak with the Female Elf Ghost standing just outside the statue.
Select Option 3.
2
Interact with Dark Angel Statue 1.1
Go to the Dark Angel Statue 1.1 (Location K3) and listen to the story.
3
Speak with NPC Surname of Dark Angel (K3) again.
Speak with NPC Surname of Dark Angel (Location K3) again to tell her the story you heard from the Dark Angel Statue 1.1.
4
Speak with NPC Rodrigo
Speak with NPC Rodrigo back in the first large room with the Noisy's (Large Mosquito Mob Type)
Give him 10,000 Gold to tell you everything he knows about the Altars
Note: This step is not necessary, as the rest of this guide already incorporates what he would have told you.
5
Donate Dripping Heart into Prison Flame Altar (Location: D6)
Hungerlust Altar Options
Go to the altar Prison Flame of Hungerlust (餓欲の獄炎) and donate (6x) Dripping Heart
6
Enter Dark Angel Statue and Complete Battle
Head back to the Dark Angel Statue and choose option 2 (Found the Body)
If this is the first time defeating this statue, you are unable to leave the instance until the mobs or your entire party has perished.
Mob is very slow moving
Mob leaves a poison cloud upon death
Poison Guard may be beneficial
Dark Angel Statue 1.2 - Action Steps
Step
Action
Action Details
1
Examine the Dark Angel Statue (Location G4)
Go to the Dark Angel Statue 1.2 (Location: G4)
Head up the stairs right next to the 1st Final Battle Statue
Go down the right stairwell turning left at the bottom past frogs
Follow the walkway until you come to the next stairwell on your left and head up this stairwell
Exit stairwell right and follow path to Dark Angel Statue
Interact with the Dark Angel Statue 1.2 (Location: G4)
2
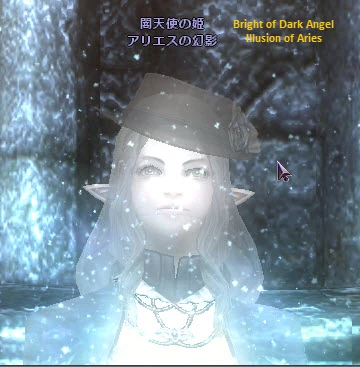
Speak with NPC Bright of Dark Angel (Location G3)
Bright of Dark Angel Location G3
Speak with the ghostly figure (NPC Bright of Dark Angel) right next to the Dark Angel Statue 1.2 to tell her the story learned from speaking with the Dark Angel Statue 1.2.
3
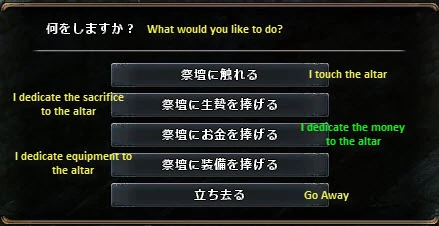
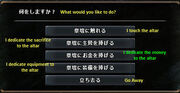
Activate the altar Prison Flame of Fatalpride (宿傲の獄炎) - (Location E7)
Altar Options
Go to the altar Prison Flame of Fatalpride (宿傲の獄炎) and choose Option 3 ("I dedicate the money to the altar")
Donate 11,111 Gold to the Altar
4
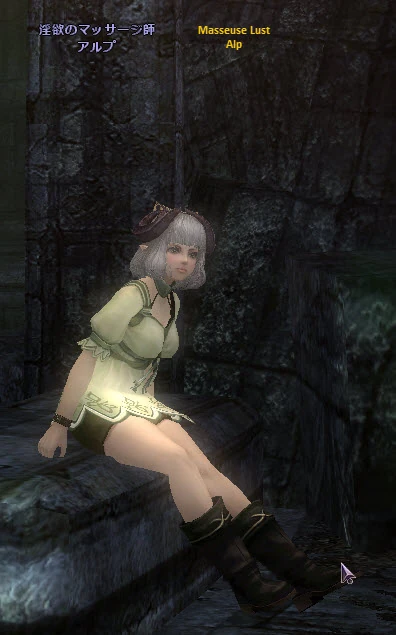
Activate the altar Prison Flame of Bawdrydamp (淫湿の獄炎) - (Location: F7)
NPC Alp (Location J3)
First you need to get a massage from NPC Alp (Location J3), but you must first take off all of your equipment, so that the 12,000 Gold option appears on the menu. Choose this option to receive your massage and a buff.
Note: This will give you a buff that you need to activate the next altar. This buff will last for only 5 minutes or until you perish. You must reach the Bawdrydamp Altar within this 5-minute time-frame.
Once you have received the buff, you need to put your equipment back on and head to the altar, Prison Flame of Bawdrydamp (淫湿の獄炎).
Head back up the stairwell closest to Alp (Location J3) and take the teleporter at the opposite end of the large room you come into.
Head towards the altar of Fatalpride taking the pathway to the right towards the Monk Type mobs.
Head past the Monk Type mobs down the stairwell.
Make your way around this path, to the next stairwell.
Note: Watch out for the Gas Clouds and Gas Traps along this pathway. You must time this correctly. This is the source of frustration during this step. If you die here, you will need to get another massage from Alp (Location J3).
When you reach the top of the next stairwell, you will need to follow the pathway to the right past the Noisies and the Monk mob types to the Altar. Again you must be careful not to perish at this point.
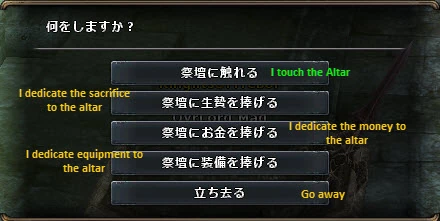
Altar Options (Location F7)
Interact with the altar of Bawdrydamp and choose the option "Touch the Altar".
5
Activate the altar Prison Flame of Jealouscore (深嫉の獄炎) - (Location: E8)
NPC Pagaji (Location: H3)
Jealousy Necklace (dropped by Raider Chief)
1/2
First you must either farm a "Jealousy Necklace" (translated as Sonemi Necklace in Japan) from either the Raider Chief mobs or you may buy one from NPC Pagaji (Location: H3) for 7,750 Gold.
Go to the altar Prison Flame of Jealouscore (深嫉の獄炎) and donate the "Jealousy Necklace" to the altar.
6
Go to Dark Angel Statue 1.2 and Complete Battle
Go back to Dark Angel Statue 1.2 (Location: G4) and complete the battle.
If this is the first time defeating this statue, you are unable to leave the instance until the mobs or your entire party has perished.
Mob is easy to kite.
Mob casts Magic Missile (Low Damage) and Petrify
Mob has a Hard Normal Hit
Dark Angel Statue 1.3 - Action Steps
Step
Action
Action Steps
1
Interact with Dark Angel Statue 1.3 (D4)
Head to the Dark Angel Statue 1.3 (Location: D4)
Head down the stairwell, which was blocked by a vale prior to defeating statue 1.2.
Activate Resurrection Shrine #3 at the bottom of the stairs and make note of the machine to the right of the Res-Shrine.
Head down the left path from the Res-Shrine until you come to another stairwell leading up.
Head up the stairwell and as you enter the large room take the right doorway to the another large room (be mindful of the sleep traps along this path).
Once you enter the next large room enter the doorway directly across the room, which leads to the "Dark Angel Statue" room.
Interact with the Dark Angel Statue 1.3
Note: There are quite a few sleep traps along this pathway. Take care to time your movements and avoid mobs along the way.
2
Speak with NPC Princess of Dark Angel (D4)
Speak with NPC Princess of Dark Angel in this same room and tell her the story you learned from interacting with the Dark Angel Statue.
3
Speak with NPC Toto (F5)
Exit the Dark Angel Statue room.
Exit the door at the other end of the large room just next to the Dark Angel Statue room.
Once in the large room, take the doorway to the right and follow the stairs down to NPC Toto (Location: F5) [[[Kobold (Mob Type)|Kobold Mob Type]]]
Speak with NPC Toto (F5) and he will tell you how hungry he is.
4
Farm Materials
If you haven't already done so, you will need to farm and/or purchase the following materials in order to create the "Cursed Pet Food"
(6x) Spoiled Cheesecake - Purchased from NPC Pagaji (H3)
(6x) Heart of Stone - Dropped by "Arcane Smog" [[[Gas Cloud|Gas Cloud Mob Type]]]
5
Make "Cursed Pet Food"
Pet Food Machine Options
Pet Food Create Options
1/2
Head back to the machine next to Resurrection Shrine #3 at location xx
Interact with the machine and select the option "Pet Food Creation Cursed" and then option "Create"
6
Feed "Cursed Pet Food" to NPC Toto
Head back to NPC Toto (Location: F5) with the "Cursed Pet Food" and give it to him.
Note: You basically created a laxitive, in the form of pet food, and NPC Toto will run to the toilet that you passed along the way. Get ready to dig through some waste...
7
Donate "Toto Fecal Matter" into "Prison Flame" (獄炎) altars
Toto's Throne
"Shitter's Full!"
Gloves, Bags and Masks are not provided!
1/3
After NPC Toto returns from his unfortunate bowel movement, you will need to head to the toilet and remove some feces.
Donate the feces to each of the four "Prison Flame" (獄炎) altars.
Hungerlust (餓欲) - (Location: D6)
Fatalpride (宿傲) - (Location: E7)
Bawdrydamp (淫湿) - (Location: F7)
Jealouscore (深嫉) - (Location: E8)
You will need to repeat these steps four separate times, as you can only hold enough feces for a single altar at a time.
Note 1: Digging through the toilet to acquire feces is a dirty job and you will get poisoned during this process. If you have a Poison Guard, you should equip it now.
Note 2: In "Party" mode (not worth it in 'Story' mode), there is an alternative to running back/forth between the toilet and the altar room. After acquiring the first fecal matter, you can jump into the waterway and commit suicide (recommend removing all your equipment). When you die you will appear near the "Resurrection" Shrine #2" in the altar room. If this does not happen the first time you commit suicide, when you make your way back to the altar room, commit suicide in the waterway near Res-Shrine #2 and each subsequent waterway death will result in your soul being right next to the Res-Shrine #2 putting you closer to the various altar's. Upon completing the fourth donation, you can commit suicide and warp your body to the last Res-Shrine you activated, which should be "Resurrection Shrine #3".
8
Enter Dark Angel Statue 1.3 and Defeat Mob
Once you have donated NPC Toto's fecal matter to the Altar's to increase the intensity of the flames, you should be able to return to the Dark Angel Statue 1.3 to complete the final battle.
Dark Angel Statue 1.4
Dark Angel Statue 1.4 - Details
Location
Enemies
Enemies: 5x Harm [Spider]
Comments
Dark Angel Statue 1.4 - Action Details
Step
Action
Action Details
1
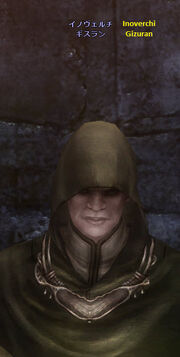
Speak with NPC Inoverchi Gizuran (I9)
NPC Gizuran (Location: I9)
After defeating the Dark Angel Statue 1.3 , there's a teleporter that will take you near the entry to a teleporter that originally blocked. Touch this teleporter.
You will appear in a small corridor facing stairs that go up to Resurrection Shrine #4. Continue past the Res-Shrine until you come upon a ghostly figure on a cliff.
From this vantage point, if you look down and across from the cliff, you'll see a door near another teleporter. Drop down off the cliff and go through this doorway and you will find NPC Inoverchi Gizuran (Location: I9).
Speak with NPC Gizuran (I9).
2
Take Teleporter to Disco Zombie Hall
After you are done speaking with NPC Gizuran (I9), come back out and exit left in the large room and continue to the far end of the room.
At the far end of this room, you will come to a large rock with a teleporter on top of it (Location: J6). Traverse the smaller rocks to get on top of the bigger rock and take the teleporter to the "Disco Zombie" Hall.
3
Interact with Dark Angel Statue 1.4 (Location: E7)
Go through the large arched doorway at the opposite end of where you entered the "Disco Zombie" Hall.
Follow the corridor you enter until you exit into a hallway where you can go left or right.
Note: In "Party Mode" there are two beetles in the middle of the corridor and very powerful "Statue" type mobs just on the other side of the corridor. Time a leap over the beetles to the end of the corridor is your best move and using stealth in the hallway to get around the statues.
When you exit the corridor, there is a ghostly figure at the end of the hallway on the left (Location: E10) and to the right is the Dark Angel Statue 1.4 (Location: E7) . You will need to interact with the Dark Angel Statue 1.4 (Location: E7) prior to talking with the ghostly figure (next step), however you'll need to be sure to avoid the statue mob near the statue.
Note: There is an NPC in the form of a "Lesser Demon" in a doorway right next to the Dark Angel Statue 1.4 (Location: D8). You should make note of this NPC because you will be visiting this location quite often going forward. This is the gateway to Hell!
4
Speak to NPC Princess of Darkness Angel (Location: E10)
Princess of Dark Angel (Location: E10)
Princess of Dark Angel Dialogue Options
1/2
Head to the opposite end of the hallway from the Dark Angel Statue 1.4 and speak to the ghostly figure known as the "Princess of Darkness Angel " and select the option to tell her about the 6th Brother (see images in slideshow).
5
Acquire Goat Mask (If Required)
NPC Baruzefon (Location: D8)
Baruzefon 1st Dialogue Box
1/2
Note: If you already have a "Goat Mask" and it is in your inventory, you may skip this step.
Before you can enter "Hell's Square", you'll need to have a "Goat Mask". This is the same "Goat Mask" that you used in Facility 13. If you no longer have the "Goat Mask" that you used in Facility 13, there are two ways to reacquire the mask.
Option 1: Purchase Goat Mask from Facility 13 NPC in the Magic Barrier room.
Option 2: Speak with NPC Baruzefon (Location: D8) and choose Option 2 on the NPC Dialogue (the translation doesn't make much sense). Defeat one of the Lesser Demon's in a hidden battle and loot the body (there are three in Party Mode but only 1 in Story Mode).
6
Enter Hell's Square
NPC Baruzefon (Location: D8)
Hell Dialogue Box 1
Hell Dialogue Box 2
Hell Dialogue Box 3
1/4
Note: It's best to memorize the steps below because you'll be entering Hell's Sqaure often.
Now that you have the 'Goat Mask' speak with NPC Baruzefon (Location: D8) and follow the dialogue sequence below exactly.
Dialogue Box 1: Choose Option 1 - "I suffer your face of goat"
Dialogue Box 2: Choose Option 2 (the translation here didn't make sense but the choice is right)
Dialogue Box 3: Choose Option 2 - "To Hell"
7
Speak with NPC "Vie Pradesh Cordova Karma Seo"
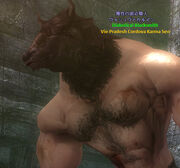
The "Diabolical Blacksmith" from Hell!
We'll just call him "Vie" or "Demon Blacksmith" for short...
You'll want to speak with NPC Vie and choose Option 1 - "I want you to make a saw diabolical". He won't give you the time of day until you speak with Inoverchi NPC Giovanni.
8
Speak with NPC Jousani
NPC Jousani
NPC Jousani - Dialogue Box
1/2
Speak with NPC Giovanni and choose both dialogue Option 1 - "The Taso friend of yours is worried".
Speak with NPC Giovanni again and choose Option 2 - "It introduced me to the craftsmen make the saw diabolical"
Note: If both dialogue options are not present initially, you may have to speak again with Giovanni immediately or you'll need to speak with Vie one more time before the 2nd dialogue option becomes available (see pics in slideshow).
9
Speak with NPC Vie
The Diabolic Blacksmith - A Friend of a Friend of a Friend...
NPC Vie Dialogue Box 1
NPC Vie Dialogue Box 2
1/3
Now that we've been introduced, you'll want to speak to NPC Vie again and choose Option 1 - "I want you to make a saw diabolical"
Then, choose Option 1 - "(1x) Dripping Heart"
Accept Mission to acquire necessary materials needed to make the "Diabolical Saw "
10
Acquire Mats needed to make "Diabolical Saw "
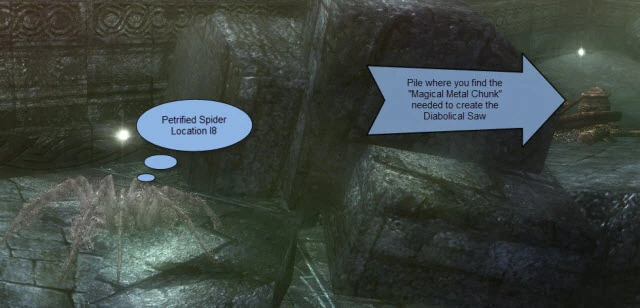
Magical Metal Chunk Acquired from Pile on Right
Acquire "Magical Metal Chunk" from pile in "Cliff Room"
Head back into the "Disco Zombie" Hall follow the left wall until you come to a doorway. Take the teleporter in this doorway back to the "Cliff Room".
You'll be at the bottom of the "Cliff Room" right next to the rock where you teleport to the "Disco Zombie" room. On the other side of this rock, there's some rocks you can climb back up to the cliff that will take you to a campfire.
Head past the campfire and jump to the next ledge above the doorway (it may take a few attempts to make this jump).
After the successful jump, follow the cliff edge until you come upon a pile on the ground. Search the pile and you will get the "Magical Metal Chunk "
Farm (11x) Demon's Blood (see Material Checklist for Mobs that drop this item)
(5x) Demon's Blood are needed for initial creation and it will cost you (2x) Demon's Blood for each repair of the saw.
Farm (3x) Armor Remains (see Material Checklist for Mobs that drop this item)
11
Make "Diabolical Saw "
Head back to Hell's Square (see Step 6 - "Enter Hell's Square" if you forgot sequence).
Speak with NPC Vie and turn in the mission you were given to collect the necessary materials to create the "Diabolical Saw"
Receive "Diabolical Saw"
12
Cut Chains off of "Petrified Spiders "
Chained Petrified Spider
Petrified Spider Perspective - Location I6
Petrified Spider Perspective - Location I8
Petrified Spider Perspective - Location J7
Petrified Spider Perspective - Location J6
1/5
There are a total of four "Chained Petrified Spiders " and they all reside in various locations in the "Cliff Room". One down below and the remaining three are along the cliff ledges.
It is highly recommended that you "repair" your "Diabolical Saw" after you cut the chain off of each spider. This requires that you run back to Hell and donate (2x) Demon's Blood to NPC Vie. If you fail to repair the "Diabolical Saw", it will break and you'll have to follow the process again to create a new saw.
Below are brief descriptions of the locations of each spider. They do not have to be completed in this order.
Location I6 (Ground Floor): This spider is located on the ground floor in a doorway right next to the teleporter on the rock that takes you to the "Disco Zombie Hall".
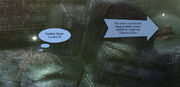
Location I8 (Up Top):
This spider is the first of three located on the cliff ledges (up top). You'll need to make your way to the top of the cliff by taking the "teleporter" just outside the doorway of NPC Gizuran (Location: I9).
After teleporting, re-enter the "Cliff Room" and follow the cliff edge left around to he opposite side until you find the spider. This spider is approximately right above the location of NPC Gizuran.
Location J7 (Up Top):
This spider is located up top on the cliff's ledge and after teleporting you'll want to follow the cliff's ledge to the right.
You'll encounter this spider as you approach a ledge you'll need to climb up. You can either perform a "run and jump" to the spider's location, or climb up to the next tier and simply drop down to the lower ledge where the spider is located.
Location J6 (Up Top):
This final spider is located at the far end of the room along the cliff ledge.
After teleporting to the top, you'll want to follow the cliff's ledge to the right.
Continue passed the 3rd spider until you come to the end of the cliff's edge. You'll climb up to a platform to reach the cliff's edge.
When you come to the end of the cliff's ledge, you should see the spider off in the distance perched on a ledge protruding out of the side hill.
You'll need to drop down to a smaller protruding ledge (Location K6) from where you are standing and perform a "run and jump" to the "side hill" on the right.
Once on top of the "side hill" simply remain close to the wall to avoid sliding down the hill and make your way over to the spider's location.
13
Enter Dark Angel Statue 1.4 and Complete Battle
Dark Angel Statue 1.4 Dialogue to Enter Final Battle
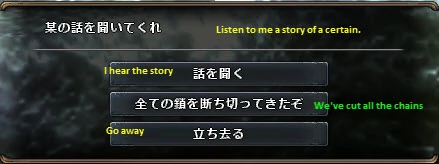
After you successfully completed cutting the chains off of each "Petrified Spider" you'll want to return to the Dark Angel Statue 1.4
Speak to the statue and choose Option 2 - "We've cut all the chains"
Enter and complete the final battle.
14
Take Teleporter to Floor 2
After you complet the Dark Angel Statue 1.4 battle take the teleporter, just outside of the statue, to Floor 2.
They cast Silent/Armor Decrease. Self buff of Attack-Aura, Magic Aura, Physical Defense & Magical Defense. Really easy to kite. One get all and just stay behind a wall, they shoot against the wall. So the other can get one out, best way with a decoy.
Dark Angel Statue - Action Details
Step
Action
Action Details
1
Take Teleporter to Floor 2
After defeating Dark Angel Statue 1.4 take the teleporter, which was protected by the barrier, to Floor 2.
2
Activate the Floor 2 Post
When you get to Floor 2, be sure to activate the Gold Post that takes you between floors.
3
Speak with NPC Yakatekutori
Head past the Demon Brute to the far side and take the door on your left.
Head up the stairwell and perform a "Dash/Jump" across the open area towards the tablet no the opposite side. About mid-way through the air you will be teleported to the platform on the opposite side of the room.
Walk through the entry into the "Beetle Room" and turn left, following the ramp down and speak with the Imp, Yakatekutori.
4
Head to the "Broken Platforms" room.
Head back up the ramp past the fire trap. When you come to the edge of the platform, drop down to the next platform and perform a "Dash/Jump" to the opposite platform.
Walk left underneath the bridge and work your way to the top.
Exit the "Beetle Room" through the doorway (watch for the fire trap) and head up the stairs until you enter the "Broken Platforms" room (a very large room with dis-jointed walkways).
5
Find & Interact with the Dark Angel Statue 2.1
When you enter the "Broken Platforms" room you'll see a bridge to your left and some Disco Zombies across the other side of the bridge.
Head across the bridge and towards the first column you see on your left.
Pass the first column and head towards the 2nd column and perform a "Dash/Jump" to the platform across from this 2nd column.
Watch out of the Hellspawn guarding the doorway on your left, leading to a set of stairs.
Take the stairs down into the next room (careful to watch out for the sleep trap in the next room).
As you enter the next room, you'll want to head to the wall opposite the door and turn right and follow the wall.
Enter the first door on your left and take the stairs down to the Dark Angel Statue 2.1
Interact with the Dark Angel Statue 2.1
6
Speak with NPC Princess of Darkness Angel
Head back up the stairs and turn right as you exit the doorway.
Following the wall you will come to a doorway on your right with a barrier.
Opposite of the doorway, tucked away behind some debris in the room, you'll find the "Princess of Darkness Angel".
Speak with the Princess of Darkness Angel, selecting Option 1 - "Tell her the story of the 5th brother".
7
Enter Hell's Square
Head back to the Floor 2 entrance and take the post in the far back corner back to the end of Floor 1 and follow the process to enter Hell's Square.
8
Speak with NPC Yukobakku (Location K2)
Head towards the far back room and climb up on the rock with the ladder.
When you reach the top, speak with the Imp Yukobakku, asking him to introduce you to the Hell Merchant (Option 1 in dialogue).
He will ask you for (1x) Dripping Heart (Option 1 in 2nd dialogue box)
9
Speak with NPC Gusain (Location J3)
Go in the direction as if you are leaving Hell's Square.
However, when you get to the ladder that takes you up and out, you'll see a "walker" NPC on the platform behind the ladder.
Perform a "Dash/Jump" over to the reaper platform and speak with NPC Gusain and tell him you want to know about the "Transit Bill" (Option 1 in 1st Dialogue).
He will tell you it will cost you (1x) Dripping Heart (Option 1 in 2nd Dialogue).
10
Speak to (5x) Slates
You will need to interact with the 5x Slates in the area. The first four slates you interact with are essentially riddles to decipher the "contracts" needed.
The fifth slate is not the same for everyone, but will let you know which "slate" applies to your particular progression.
You should be able to decipher which slate applies to your progression by focusing on the keywords in bold below.
As an example, my 5th slate translated as: "The barrier Yafusuma is paved, live person, who dies, drilling all."
The keyword in that statement is "Yafusuma", which corresponds to the contracts "Wind, Earth, Fire" (All the elements of a great band).
11
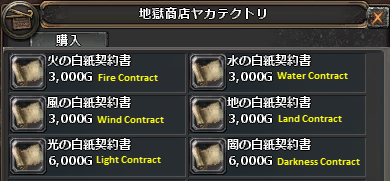
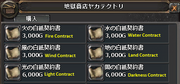
Purchase Contracts
Blank Contracts for Purchase
After reading all five slates in the previous step, you should know which contracts to now purchase.
Go to NPC Yakatekutori (Beetles Room) and purchase the necessary contracts.
12
Give Contracts & (10x) Dripping Hearts to NPC Gusain
Go to Hell's Square and speak with NPC Gusain (Walker Mob Type)
Ask him to give you the Transit Bill
Give him the contracts in the correct order (see table)
Give him (10x) Dripping Heart
Receive Transit Pass to enter Dark Angel Statue
13
Activate Dark Angel Statue 2.1 and Complete Final Battle
After you getting the Transit Pass, head back to the Dark Angel Statue and choose Option 2
Enter Dark Angel Statue and complete final battle.
Dark Angel Statue 2.1 - Slate Details
Slate
Coord
Japanese
English
Contracts
Transition (転移)
J5 - Beetle Room
本来再現のできない転移の再現には共存できぬ光と闇を合わせた。
転移の要素のひとつは地の堤防にて堰きとめることができる。
The reproduction of transition that can not be original reproducible was combined can be unexpected light and darkness coexist.
One of the transition elements can be dammed in the land of the embankment.
Light, Dark, Water
Yafusuma (矢襖)
K7 - Large Broken Platforms Room
矢襖の矢は地により生まれ風に乗せて討った。
矢襖の要素のひとつはは水をかけることにより鎮められる。
Arrow of Yafusuma was struck to put the born-style by the earth.
One of the elements of Yafusuma can be calmed by applying the water.
Wind, Earth, Fire
Honookaminari (炎雷)
J5 - Large Broken Platforms Room
炎雷は火と風が交わり生まれ出た。
炎雷の要素の一つは闇を切り裂く。
Honookaminari the fire and the wind came out born fellowship.
One of the elements of fire lightning cuts through the darkness.
Fire, Wind, Light
Dokukiri (毒霧)
J9 - Large Broken Platforms Room
毒霧は地より生じた水を元に作成した。
毒霧の要素のひとつは光の中で存在できない。
Dokukiri was created based on the water produced from the earth.
One of the elements of Dokukiri can not be there in the light.
Water, Earth, Dark
5th Statue
Down stairwell next to the staircase leading to Dark Angel Statue
Look for the keywords from the slates above in the translation of the 5th statue to figure out which contracts you need. The order of the contracts is an important factor.
Dark Angel Statue 2.2
Dark Angel Statue - Details
Location
D3
Enemies
Party Mode: (5x) Nobody; (1x) Deadhead
Story Mode: (1x) Deadhead
Comments
Deadhead cast heal before he do his AoE (he is like the skulls in Decension Ruins, just a bit bigger). The Nobody's are like in F1 Statue 1 but slower, easy to kite.
Dark Angel Statue - Action Details
Step
Action
Action Details
1
Find Dark Angel Statue 2.2 (Location: D3)
After clearing Dark Angel Statue 2.1 head to the stairwell that was blocked by a barrier. The stairwell is located across from NPC Princess of Dark Angel.
Follow the stairwell down and take the teleporter.
Follow the left wall around until you've encountered the next resurrection shrine
After activiating the res-shrine, you can find the statue by following the right pathway passed the Demon Brute(s)
Interact with the Dark Angel Statue to learn the story of the next brother.
2
Talk with NPC Princess of Dark Angel (Location: E2)
Head back to where you first entered this area and speak with the ghostly NPC Princess of Dark Angel and tell her the story of the next brother.
Lesser Demons will cast 2 Flame Arrows in a row. The rest is the usual lesser demon stuff, nothing special.
Materials
(15x) Dripping Heart
Dark Angel Statue - Action Details
Step
Action
Action Details
1
Go to Dark Angel Statue 3.1
After defeating Dark Angel Statue 2.2 take the teleporter just outside the statue to the 3rd floor.
You'll appear in a large room right next to a resurrection shrine. Find your way to a teleporter in this room just past a Greedy Devil(s) (two in Party Mode).
Take the teleporter to the walkways at the very top of this large room and follow your way around until you come to a room with a Resurrection Shrine and a Gold Teleporter.
Contine on from here until you find the Dark Angel Statue 3.1 (Hint: When you were on the walkways, before climbing down the ladder, you could see the Dark Angel Statue on another walkway in the large room. There's a way to get to these other walkways.)
Once you find the Dark Angel Statue 3.1, speak with it to learn the story of the next brother.
2
Speak with Princess of Dark Angel
Head back to the location where the Gold Teleporter is located and speak with the Princess of Dark Angel (NPC Ghost) and tell her the story of the brother.
3
Go to Hell's Square
Make your way back to Hell's Square (Hint: Taking the Gold Teleporter to Floor 2 and and using the teleporter in that room will take you right back to the entrance of Hell's Square).
Speak with NPC Giovanni (Hint: Just choose all dialogue options)
Speak with NPC Abigoru (similar to large Toy Soldier or moving Armor) and give it (15x) (15x) Dripping Heart.
Speak with NPC Abigoru again and choose the new option in the dialogue.
Speak with the Demon Blacksmith and he will send you off to find a Sacred Log
4
Get Sacred Log
Note: Once you have the sacred log you cannot exit the dungeon. If you leave the dungeon, you will have to start over with Step 3 and donate another (15x) Dripping Heart.
Head back to Floor 3 and find the Sacred Log (Hint: Head towards the Dark Angel Statue and you will find it in a small room at the bottom of a set of stairs.)
Take a chunk of the Sacred Log by interacting with it (Note: This will weigh you down imensely).
Make your way back to Hell's Square with the log in tow.
Head back to the First Floor and go to the room with the Altar's you set aflame earlier in the dungeon.
Find the Altar of Fatalpride (Japanese: 宿傲 Translation: Yado傲) located in quadrant E7 and light the torch (Hint: It's the first altar you come along after passing the Resurrection Shrine in this room).
Note: If this step is done properly, you will receive your lighted torch back after lighting it.
7
Light the Torches on Floor 3
There is a set of six torches you will need to light on the third floor to open the Dark Angel Statue 3.1
Four of the torches can be found between the beginning of the walkway path in the large room as you make your way to the Dark Angel Statue. The 6th, and often overlooked torch, is located right next to the teleporter in the large room that took you to the upper walkway (behind Greedy Devil(s)).
Troubleshooting Guide:
If you try to light a torch and nothing happens, it is because you either do not have the Hellfire Torch in your posession or you failed to light it at the Altar of Fatalpride.
Check your Journal Inventory and look for a torch. If it's not there you need to go back to Steps 3-5.
If you have the torch, you'll need to go back to Step 6 and make sure you light the Hellfire Torch (Note: Trying to light the Hellfire Torch at the same altar multiple times will extinguish the flame).
If you try to light a torch and you take damage, you have lit the Hellfire Torch at the wrong Altar. Go back to Step 6 and make sure you light the Hellfire Torch at the correct Altar.
Note: I know that trying to light the Torch at the same altar a 2nd time will, in effect, extinguish the flame on the Hellfire Torch. So, I haven't verified this but you may have to return the flame to the Altar you first lit it (incorrect altar), resetting theHellfire Torch, and then go to the correct altar and light it again.
8
Activate Dark Angel Statue 3.1 and Complete Final Batte
After successfully lighting all six torches on Floor 3, activate the Dark Angel Statue 3.1
Complete Final Battle
Note: If you try to activate the Dark Angel Statue and are randomly teleported in the dungeon, it is because you failed to light all six torches. Go back to Step 7 and make sure you've lit all six.
Bulls with Fireball, hurts a lot with low Mdef. Got on my thief ~750 dmg with 175 mdef and ~650 with 250 mdef
Materials
(3x) Dripping Heart, (4x) Captured Rabbit, (20x) Sacred Tree Firewood
Dark Angel Statue - Action Details
Step
Action
Action Details
1
Go to Dark Angel Statue 3.2 (H6)
After defeating Dark Angel Statue 3.1, take the teleporter that was hidden behind the vale right next to the statue.
Find the Dark Angel Statue 3.2 in this next area and learn the story of the next brother.
2
Speak with Princess of Dark Angel (H7)
Speak with Princess of Dark Angel in the room just opposite of the Dark Angel Statue 3.2.
3
Go to Hell's Square
Speak with NPC Giovanni and select Option 7 (Japanese: , English: "I'm looking for a bard")
Speak with NPC Dzu~yoguraru (Vorpal Bunny) and select Option 1 (Japanese: , English: "I want to hear about the Melody of Awakening")
Give NPC Dzu~yoguraru(3x) Dripping Heart
There are four parts to the melody, but the order in which the parts must be played are different for every soul. The four parts, and the order in which they should be played, are in the 6th part of the dialogue (see sample pic to right).
4
Farm Mats
If you haven't already done so, you will need to gather (4x) Rabbits and (20x) Sacred Tree Firewood.
The Rabbits can be farmed near the Dark Angel Statue 3.2.
Note: If you leave the dungeon, any rabbits you collect will perish and you will need to farm more rabbits.
Sacred Tree Firewood
This will take multiple trips to complete but the process is the same.
Step 1: Find the "Woodcutting Machine" (Location: xx) in the same zone where you find the rabbits. You can find the machine by dropping down into the gully on the left side (as you enter zone) and taking any of the stairs up.
Step 2: Take the teleporter next to the machine back to the beginning of the 3rd floor.
Step 3: Go to the Sacred Log and take a piece.
Step 4: Go back to "Woodcutting Machine" and create the firerwood.
Step 5: Repeat Steps 2-4 until you have (20x) Sacred Tree Firewood
5
Play "Melody of Awakening"
Suggestion: Since the "Hellfire Torch" is a soul based item, if you have more than one toon on your soul park a 2nd toon on the 1st floor near the Prison Flame Altars simply for the purpose of lighting the "Hellfire Torch". This will save a lot of time running between the floors.
Step 1: Light your Hellfire Torch at the "Prison Flame" altar that correlates to the first melody on your list (see "Table of Melodies" below).
Note 1: If the first melody in your list is "Heat Death", your Hellfire Torch should already be carrying the Prison Flame of Yado傲 (宿傲の獄炎) from the previous Dark Angel Statue mission.
Note 2: You can check the Hellfire Torch in your Journal Inventory to see which "Prison Flame" it is carrying by matching the Japanese symbols in bold in the "Table of Melodies" to the two characters in brackets on the Hellfire Torch
Step 2: Go to the Torture Instrument machine (in the room next to the Princess of Dark Angel) and insert (1x) Rabbit and the corresponding number of "Sacred Tree Firewood".
Step 3: Repeat Steps 1-2 for the remaining songs on your list, being sure to play them in the order that was given to you.
6
Go to Dark Angel Statue 3.2 and Complete Final Battle
Slow attacks. Easy to kite. Nothing really special.
Materials
Dark Angel Statue - Action Details
Step
Action
Action Details
1
Go to Dark Angel Statue 3.3 (Location C3)
After clearing Dark Angel Statue 3.2, take the teleporter just outside of this statue to a new zone.
Follow the path until you come to a T-Intersection and follow the walkway left until you find Dark Angel Statue 3.3
2
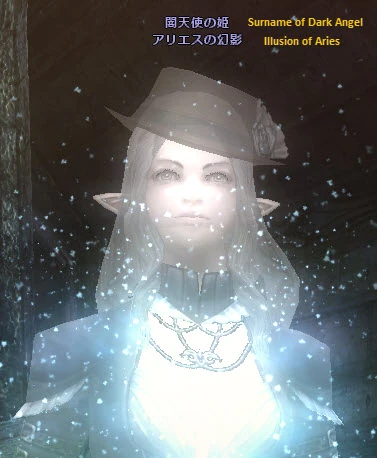
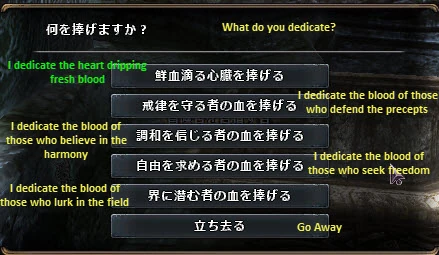
Speak with Illusion of Aries
Speak with the NPC Illusion of Aries (アリエスの幻影) and tell her the story you learned from the Dark Angel Statue 3.3
She will see you as her servant there to take her meal request. She will not divulge any information until you cook and bring her the meal she requests. This is different for every individual.
Take note of the "Appetizer", "Main Course" and "Dessert" that she requests from this conversation (see example conversation to the right).
Note: Once you have your three recipes you cannot leave the dungeon, or you will have to get three new meals by talking to NPC Illusion of Aries (アリエスの幻影) again.
3
Go to Hell's Square
Head back to Hell's Square and speak with Inoverchi type NPC Giovanni (ジョバンニ) and ask him the last question on the list that translates to "I'm looking for a cook". (note: this NPC DOES NOT have a leave option like the other NPC's do. SO choose the very last option "I'm looking for a cook").
Speak with NPC Nisuroku (ニスロク) (the fattie mob type)
Acquire Recipes
You can either buy the recipes from NPC Nisuroku (ニスロク)... OR
You can search the three toilets you came across throughout the dungeon
Speak with the Gargoyle type NPC Merukomu (メルコム) to learn how to cook the recipes you acquired. You will need (2x) Dripping Heart for each recipe book.
4
Collect Materials for Cooking Recipes
See the table below for the materials you will need to cook the recipes.
You may acquire these materials in the following ways:
Kill various mobs throughout the dungeon
Purchase many of the materials from NPC Yakutekatori (ヤクテカトリ) in the Beetles Room.
Exchange/Trade collected materials for needed materials with NPC Yakutekatori (ヤクテカトリ) in the Beetles Room.
You may also Exchange/Trade collected materials with NPC Nisuroku (ニスロク) in Hell's Square.
Sacred Tree Firewood (same process as in statue 3.2)
This will take multiple trips to complete but the process is the same.
Step 1: Find the "Woodcutting Machine" (Location: xx) in the same zone where you find the rabbits. You can find the machine by dropping down into the gully on the left side (as you enter zone) and taking any of the stairs up.
Step 2: Take the teleporter next to the machine back to the beginning of the 3rd floor.
Step 3: Go to the Sacred Log and take a piece.
Step 4: Go back to "Woodcutting Machine" and create the firerwood.
Step 5: Repeat Steps 2-4 until you have the required number of Sacred Tree Firewood to cook all three of your meals.
5
Cook the Meals
You need to cook all the meals in the Hell's Pot (Location: F5). Follow the walkway back from the Dark Angel Statue and take it to the opposite side. It is located in a small room entered through a small opening that requires taller characters to "crouch walk" to get into the room.
For each meal, you will need to set the Hellfire Torch appropriately and you will need a specific amount of Sacred Tree Firewood.
You may park another character on the same soul near the Prison Flame Altar's, as this will save you time in having to run back to the first floor.
There is no specific order you need to cook the meals, so if two of your meals require the same Prison Flame, then you may cook them both before cooking the final meal.
6
Activate Dark Angel Statue and Complete Final Battle
Return to Dark Angel Statue 3.3 with all of the meals (regular inventory) and choose option two on the dialogue to offer the first course.
The meals should be offered in the order of "Appetizer", "Main Dish" and "Dessert"
Note 1: If you happen to get poisoned while turning in any one of the meals, you have either selected them out of order or cooked the wrong meal for that course. You will need to farm more materials and cook the correct meal.
Note 2: If you are successful in turning any of the meals, you will not need to re-make those meals. So if you happen to turn in the corrct appetizer but failed when turning in the right Main Dish, you only need to pick up where you left off (the Main DIsh). Provided you do not leave the dungeon.


